Showing posts with label Green. Show all posts

Tuesday, March 5, 2013

Create 365 Project Update


Soooo, I began this collar yesterday from the spring issue of Vogue Knitting.  I'm making it in a lovely kelly green (in honor of St. Patrick's day). 

Since I'm determined to work on creating something each day, I put the yarn, magazine and needles into my purse and brought it along with me for dinner with my family...and then proceeded to get totally distracted, lose track of where I was and mess up my pattern.  I had to unravel it all (cussing the whole time..well, my brand of cussing..which usually involves words like "holy peanuts!" and "son of a biscuit").  I think maybe I need to put the yarn down for a little bit and try a different project.  Though my sewing and jewelry making projects may not be as portable, they might be a welcome respite as they come a little easier to me.

Perhaps I'll start an embroidery project..that should travel fairly easily!

I'll keep you posted on my progress, and I will certainly be revisiting this collar because I'm totally head over heels for it ;)

Hugs and Smooches,
D

Friday, February 22, 2013

Create 365 - Chunky Crochet Scarf


I took a quick break from my crochet hat project to whip up a chunky scarf.  I love working with bulky weight yarn and large crochet hooks..projects work up so much faster and I get a little sense of accomplishment to keep propelling me forward on my other projects!

Hugs and Smooches,
D

Sunday, December 9, 2012

New to the ConstantlyAlice Shop!


Holiday shopping is not over yet!  Here are a few of the newly listed items at ConstantlyAlice on Etsy.

Hugs and Smooches,
D

Monday, November 19, 2012

Tuesday, November 13, 2012

Outfit Post - Nerd Girl

..my eyes are itchy..my bangs are toooo long..I got up late..

Yeah.

Whenever I feel a little "bleh" I revert back to my natural, nerdy state ;)  I am really just a bookworm/geek at heart <3

Hugs and Smooches,
D

Monday, October 22, 2012

Outfit Post - Absinthe


Up until a few years ago, I firmly believed that I could not wear the color green, as I was certain it washed me out and gave my skin a yellow cast.  Until I discovered this particularly vibrant shade (kelly green, maybe?) that brightens up my face and makes my eyes look peacock blue.  Now I'm totally in love with it ;-)

Do you have a particular shade that you like to wear?

Hugs and Smooches,
D

Tuesday, September 25, 2012

My So Called Life


"Like with boys, how they have it so easy. How you have to pretend that you don't notice them... noticing you."  - Angela Chase, My So Called Life

Today's ConstantlyAlice look features a gorgeous green and blue flannel Lanz dress that is PERFECT for the cooler weather (it doesn't get any more cozy than flannel!)  Besides..who doesn't want to channel their inner Angela Chase?  Get your grunge on!


My So Called Life


Items can be purchased here in my ConstantlyAlice Shop:
Vintage 1980's Lanz Original Plaid Dress
Vintage 1980's Laura Ashley Blue Wool Hat

Hugs and Smooches,
D

Thursday, May 24, 2012

Outfit Post - Tangerine and Green


My curls turned out MUCH better today, though I had different plans for my bangs..  The lovely Casey over at Elegant Musings cut her bangs recently and had created a pinterest board of different ways to wear bangs.  Since my general default is either straight, or pushed to the side when they get too long, I figured I'd give some fun curly bangs a whirl...Fail.  BIG fail.  I looked like a poodle, so I shellacked them to the side.  I think I'll practice a bit more with different ways of curling them before I debut a new bang look ;-)

Hugs and Smooches,
D

Monday, May 21, 2012

Outfit Post - Butterfly Garden


I love the colors of this dress, and it has huuuge pockets, but it needed a little "something", which is why I was so delighted to discover this pretty collar at The Market Darling.  It's just what I needed!  The print is a pretty paisley made up of butterflies and polka dots, so I whipped up a pair of earrings to match as well.  You can purchase a pair in my shop here.

Hugs and Smooches,
D

Saturday, August 20, 2011

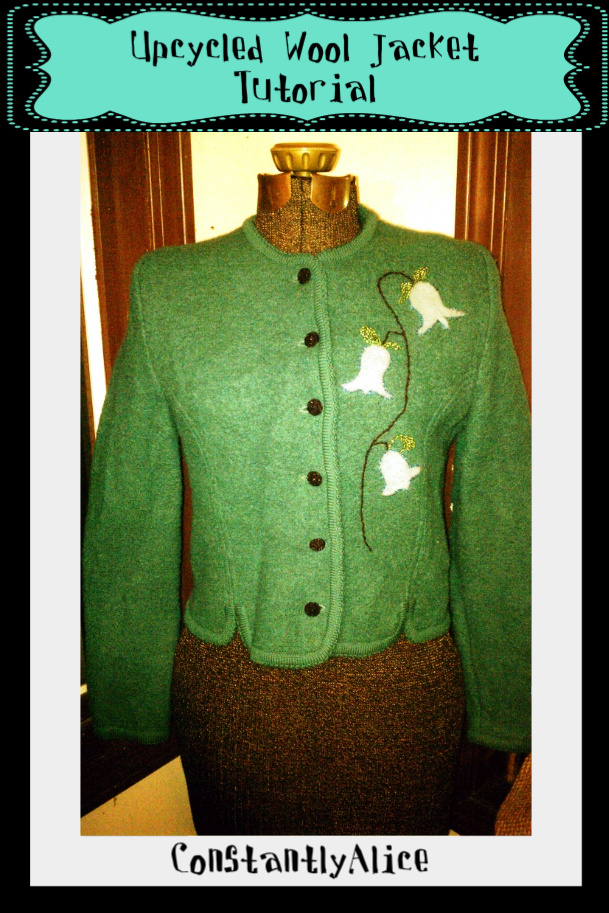
Upcycled Wool Jacket Tutorial


I have a thing for boiled wool jackets.  They are easy to find, warmer than a sweater but lighter than a coat and they come in such nice colors!  They typically range in decade from the 1960's-1980's and usually have a great shape to them, pretty buttons and sometimes have little details in the shaping or finishing of the garment.

Once in a while, I'll run across one with some small flaws (moth holes, stains etc.) or one that looks too "dated" (typically the ones from the 80's).  These ones are perfect for the project I'm going to show you.  They can be found in just about any thrift or resale shop and are very reasonable.

So, without further ado, what you will need for this project is the following:


  • Felt - You can get this a number of ways.  You can wash a wool sweater in hot water.  This will cause it to shrink and you will be able to cut and use the material like it is fabric.  You can also pick up squares of felt at your local fabric or craft store.  Make sure it is wool felt and not acrylic.
  • Needle Felter - This can also be found at any craft store.  I've shown it to the right, it's basically a bunch of long serrated needles attached to a handle.  You will use this to mesh the felt into the fabric of your coat.
  • Foam - This is for felting on.  You need something on the opposite side of your fabric for the needles to go into.
  • Thread
  • Seed beads
  • Yarn or Embroidery Floss
  • Assorted sized needles
  • Buttons (optional)
To begin, consider what you would like your pattern to look like.  I went with a bluebell pattern, but you will want to choose what suits you and what goes best with the color of your jacket.  Some suggestions are bees, anchors, roses, bluebirds or hearts.

Take the square of felt you purchased and cut out the shape that you wish to felt onto your jacket.  I did mine freehand, but you could also sketch them out or use a stencil to trace your design.


Once you have them cut (mine look like little octopus at this point :) pin them to the jacket where you would like them.  Take some time to arrange them carefully because once you begin felting, you won't be able to move them!

Now that you have them pinned, select the area you wish to begin with and place your foam pad underneath.  Take your needle felting tool and begin punching it into the shape, beginning at one side and continuing over the entire shape until it blends into your wool jacket.  Repeat with each shape you have cut out.


After your shapes are felted, you want to give them some definition.  I created a stem for my bluebells using black wool yarn and a basic backstitch.  You could also use the yarn to define the seams of your jacket if it has shaping, or to go around the outside of your object and give it a border.


Then, for a little texture and sparkle, I decided to outline my flowers with small blue seed beads and add beaded leaves.  At this point I would like to add the disclaimer that I don't bead often.  I am not sure if there is an official method for beading, but I basically bead the outline of the shape I wish to add and then fill it in.  Simply poke your threaded needle up from the back of the fabric, add a bead and then insert the needle back into the fabric as close to the initial stitch as possible.  Repeat until you have the desired shape.


That's it!  If you don't like the buttons you can change them out (like I did) but usually these types of jackets come with really gorgeous buttons.


I hope this was helpful.  If you decide to do your own jacket project, I would LOVE to see your finished results!

Hugs and Smooches,
D
Related Posts Plugin for WordPress, Blogger...