I have a thing for boiled wool jackets. They are easy to find, warmer than a sweater but lighter than a coat and they come in such nice colors! They typically range in decade from the 1960's-1980's and usually have a great shape to them, pretty buttons and sometimes have little details in the shaping or finishing of the garment.
Once in a while, I'll run across one with some small flaws (moth holes, stains etc.) or one that looks too "dated" (typically the ones from the 80's). These ones are perfect for the project I'm going to show you. They can be found in just about any thrift or resale shop and are very reasonable.
So, without further ado, what you will need for this project is the following:
- Felt - You can get this a number of ways. You can wash a wool sweater in hot water. This will cause it to shrink and you will be able to cut and use the material like it is fabric. You can also pick up squares of felt at your local fabric or craft store. Make sure it is wool felt and not acrylic.
- Needle Felter - This can also be found at any craft store. I've shown it to the right, it's basically a bunch of long serrated needles attached to a handle. You will use this to mesh the felt into the fabric of your coat.
- Foam - This is for felting on. You need something on the opposite side of your fabric for the needles to go into.
- Thread
- Seed beads
- Yarn or Embroidery Floss
- Assorted sized needles
- Buttons (optional)
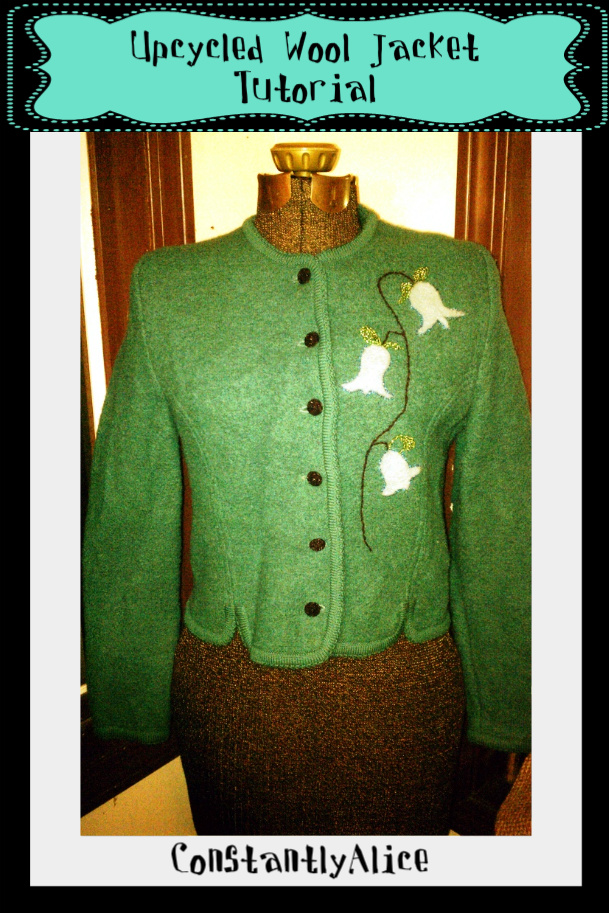
To begin, consider what you would like your pattern to look like. I went with a bluebell pattern, but you will want to choose what suits you and what goes best with the color of your jacket. Some suggestions are bees, anchors, roses, bluebirds or hearts.
Take the square of felt you purchased and cut out the shape that you wish to felt onto your jacket. I did mine freehand, but you could also sketch them out or use a stencil to trace your design.
Once you have them cut (mine look like little octopus at this point :) pin them to the jacket where you would like them. Take some time to arrange them carefully because once you begin felting, you won't be able to move them!
Now that you have them pinned, select the area you wish to begin with and place your foam pad underneath. Take your needle felting tool and begin punching it into the shape, beginning at one side and continuing over the entire shape until it blends into your wool jacket. Repeat with each shape you have cut out.
After your shapes are felted, you want to give them some definition. I created a stem for my bluebells using black wool yarn and a basic backstitch. You could also use the yarn to define the seams of your jacket if it has shaping, or to go around the outside of your object and give it a border.
Then, for a little texture and sparkle, I decided to outline my flowers with small blue seed beads and add beaded leaves. At this point I would like to add the disclaimer that I don't bead often. I am not sure if there is an official method for beading, but I basically bead the outline of the shape I wish to add and then fill it in. Simply poke your threaded needle up from the back of the fabric, add a bead and then insert the needle back into the fabric as close to the initial stitch as possible. Repeat until you have the desired shape.
That's it! If you don't like the buttons you can change them out (like I did) but usually these types of jackets come with really gorgeous buttons.
I hope this was helpful. If you decide to do your own jacket project, I would LOVE to see your finished results!
Hugs and Smooches,
D