Showing posts with label Jane Austen. Show all posts

Wednesday, December 12, 2012

A Note From The Girl Behind The Curtain..

Dearest Readers,

Yesterday, I received feedback from a ConstantlyAlice follower indicating that they had taken offense to my review of The Notorious Bettie Page (not the review itself, but the appropriateness of the subject matter.)

My initial reaction was to feel mortified.  It is certainly never my intention to offend any of you.  I consider the ConstantlyAlice blog to be about a PG-13 rating and did not think that my review violated any of those boundaries.  I have posted in the past about Bettie, and various other pin ups, without rebuke, so I thought nothing of it.

I will be honest...I obsessed a bit.  I worried about what specific part was offensive, and if any of the rest of you were offended as well.  I obsessed to the Man..I obsessed to my family..I obsessed to my friends.  One theme that came up consistently as a possible reason for this reaction was that the ConstantlyAlice image is a typically innocent and sweet one and Bettie could have, for that reason, appeared jarring and out of place with my content.

While I can understand this, ConstantlyAlice is not a fabricated personality.  It is not a corporation, or a faceless entity.  It does not market to the masses in a homogenized way aimed at making as many people "like" it as possible.  ConstantlyAlice is me.

Yup...That's me.

Yes.  I am faintly reminiscent of a fairytale character..I like fairytales.  I also like pin ups.  I am whimsical, and sometimes down right naive, but I'm also a little impatient and have a knack for sarcasm that I try to keep in check.  I have nerd-like tendencies.  I love to read and my bookshelves run the gamut from Jane Austen to Anais Nin.  I find it almost impossible to repress my humor..unless someone is grieving..in which case, pass me the tissues (I would have made an excellent "mourner-for-hire" in victorian times..)  I don't like vulgarity, but, as I've discovered, vulgarity is subjective.  I keep an open mind, trust that the people I know have the best of intentions and sometimes suffer from debilitating panic attacks brought on by my anxiety disorder and my need for perfection (only in myself..I <3 the flaws of others.)

Any or all of these things may come across from time to time here in my blog.  I consider you all friends and fellow enthusiasts.  I hope you will feel free to share with me in an open and constructive way if anything here makes you uncomfortable.  I am happy to chat with you about my choices.

I leave you with this..in the spirit of ConstantlyAlice..  I gotta be me ;)


Hugs and Smooches,
D

Monday, January 2, 2012

Book Review - AUSTENtatious Crochet

It's no secret that I love the vintage fashion of the 40's and 50's, but my first love was Jane Austen and the Regency period.  I went through a phase in my teens where I curled my hair in ringlets and wore romantic floral/lacey dresses that I imagined were a nod to Elizabeth Bennett. 
 
You can imagine my delight, then, when I stumbled across this book on my last trip to Barnes and Noble.


AUSTENtatious Crochet is a really neat book filled with Regency inspired crochet patterns interpreted with a modern sensibility.  It has just enough romance to make it pretty, but still wearable.  The patterns are clear and well written and there's something for just about everyone!

I tried out the Queen Victoria's Scarf Pattern pictured below, but I used shades of peachy rose and grey instead of the greys and blues pictured here.


It worked up quickly, felted beautifully and only took me a few hours!  Here's my interpretation:


..and here I am wearing it with my favorite rose colored shades and a cashmere headband I created to match!


I have my eye on a few additonal patterns that should be fun to work on during those chilly January evenings.  I love the Elizabeth Bennett Skirt pictured below (maybe in brown and cream):


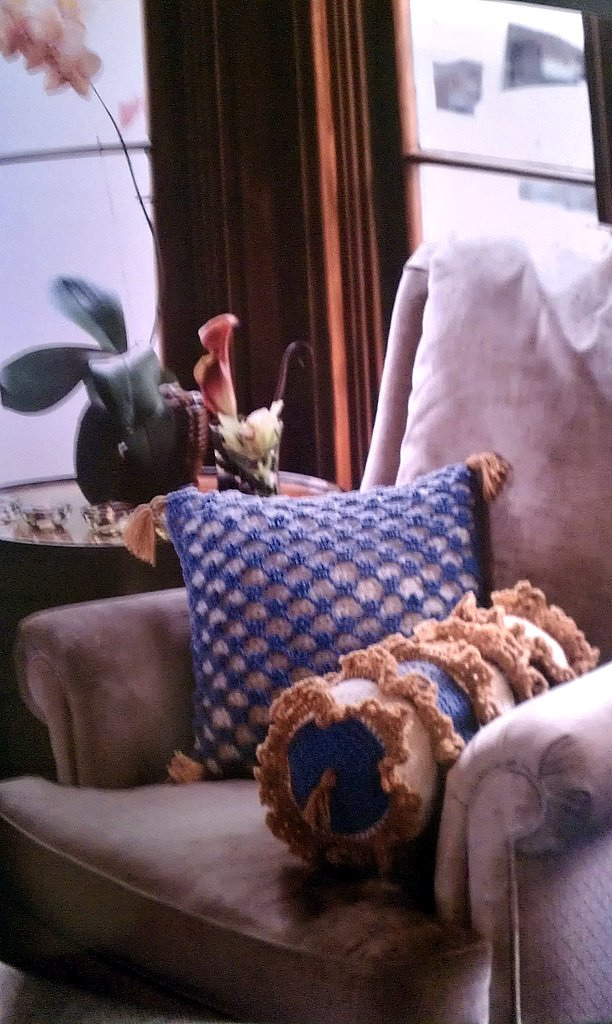
And I'd love to do these regency pillows in wine, cream and gold for my bedroom!


I wish you all a wonderful start to the New Year, I can't wait to share what I have in store for the blog with you all!

Hugs and Smooches,
D

Tuesday, November 8, 2011

Home Economics - The Jane Austen Tippet

I'm so excited to share the first of the home ec posts with you all!  I decided to begin with something seasonable and simple, a fur tippet from Jane Austen's Sewing Box.


This book is full of really fun project ideas inspired by the works of Jane Austen.  The tippet is a lovely fur scarf that drapes nicely over the shoulders and can be styled in many different ways.

You will need the following materials:
  • 1.5yd Velboa or Faux Fur (I prefer Velboa because it's soooo soft, but use what you're comfortable with!)
  • 1.5yd Lining fabric in satin, silk, cotton or shantung
  • Pins
  • Pattern Paper (wrapping paper works great for this!)
  • Pencil
  • Sewing machine (or needle if you prefer to hand sew)
  • Thread in a coordinating color
  • Weights (to hold down corners of pattern paper)
  • Tape measure or Quilters Ruler and French Curve
  • Scissors


The pattern is very simple and the measurements are given in centimeters.  You can either draw out the whole pattern, or you can simply half the pattern and put the top center of the neck on the fold of your fabric when you cut.  I prefer the second method because it insures that you will have the exact same measurements on both sides of the tippet. (My apologies on some of the pictures not being as clear as they should.  My camera was having issues and I had to borrow The Man's for some of them!)

First, you will want some paper to draft your pattern on.  I've chosen to use the back of some wrapping paper I had lying around.  (It even has grid lines printed on the back to make it easier to create straight lines!)
Be sure to weight the corners of your paper so it doesn't roll up on you!  I like to use my little snail friends :)


You can use a tape measure to measure out and draw your lines (refer to the measurements in the picture from the book), or you can use a french curve and a quilters ruler.  I like to freehand most things, but if you are uncomfortable with that, you can always bend your quilters ruler in a curve to use as a guide for the corners.


Once you've finished drawing and cutting your tippet piece, you will want to lay out your lining fabric.  If you have chosen to draw out the whole pattern piece, lay the fabric face down and pin the pattern to the wrong side.  If you have chosen to draw out the half piece, fold your fabric in half with the right sides together (the sides you want showing when you've completed your tippet) and pin the pattern with the top collar portion on the fold as I've shown below.


I have the shiny side of my poly shantung showing here, because I want the matte, slub knit side to be exposed when I finish.  Make sure your scissors are extra sharp!  Slippery fabric can be tricky to cut.

After you have cut out your lining piece, you want to follow the same steps with your fur.  I've chosen a leopard print velboa.  Here you will see the pattern piece pinned to the wrong side (on the fold!) and I've folded over the fabric so you can see what the side facing out will look like.


When it's cut and unfolded, it should look like this


Now that you've cut out both pieces, you need to match them up, right sides together, wrong sides facing out and pin them together.  It's ok if you have a few puckers at this point, you can smooth them as you sew.


Some folks prefer to shave or clip the outer edge of their faux fur to make it easier to work with.  I think it's only necessary if you are working with REALLY thick fur.  Velboa tends to be pretty manageable.

Once you have the whole thing pinned together, it should look like this


This is my walking foot..I love it with a passion typically reserved for Clark Gable and chocolate..
Now you are going to want to stitch the edges together.  I used a scant 1/4 in seam so that the tippet didn't turn out too narrow.  Keep in mind that the larger your seam allowance, the skinnier your tippet will be.  Leave a space open at the base of the neck.  This is where you will turn your tippet inside out.

Sometimes it helps to have a knitting needle handy to assist in poking out the corners and edges when you turn your tippet inside out.

One last step!  Now that you've turned your tippet inside out, fold in the bottom and top of the opening at the neck about a 1/4 in. to match your seam and make small stitches to close it up.

You're finished!

Here are some ways to style your brand new tippet.

Traditional
Wrapped Cowl Style
Tied in a bow


(I used my trusty friend Esmerelda to model here because, to be perfectly truthful, at the moment I am wearing my granny nighty and pink cats eye glasses and bear a strong resemblence to Dame Edna..)


That concludes our first Home Ec lesson! If you have any questions, please ask!  I'm happy to answer them.  If you make your own tippet, I'd love to see it.  Please feel free to share a link here in the comments, or post a picture on the ConstantlyAlice Facebook page.

Hugs and Smooches,
D


P.S.  This pattern leaves a good amount of extra fur left over..how about making it into cuffs for a pair of gloves to match your tippet?  Or a cute little beret?  The possiblities are endless!

Monday, November 7, 2011

A Few of my Favorite Things - The November Edition

Can you believe it's November??  I can't!  (Though the kiddos reminded me this morning that it's only 7 more weeks till Christmas..doesn't sound like enough time, right?)

Anywho, I've been working like a crazy person on the first Home Ec post and I want it to be just perfect, so it's taking me a little more time than I had planned, but I didn't want to disappear into blogging limbo, so today I'm going to share a few of my favorite things for November and a sneak peek at the book that I'm using as a reference for the first Home Ec. post.


Key Fabric

 Favorite thing #1 - I purchased some of this nifty key fabric.  I'm thinking of making one of the following with it..
McCalls 6123
I like the idea of this tunic with the key pattern fabric on top, solid black on the bottom and maybe a black and cream stripe for the trim.

McCalls M5591
I also like the idea of doing this skirt in the key fabric with the black contrast on the bottom.

Favorite Thing #2 - Thank you Turkeys

Thank You Turkey Craft
My girls will be doing a variation on this thank you turkey for each family member this thanksgiving.  The girls are working on making a turkey with 5 tail feathers.  Each feather will list one thing that they are thankful for about that person.

Favorite thing #3 - Ummm, pretty much this entire outfit from Modcloth. 
Modcloth
Favorite Thing #4 - Fun with Elf on the Shelf!  I actually have a vintage one that my Mum put in my stocking last year.  Click on the link and it will give you some suggestions for fun things to do with your elf this holiday season :)

Show&Tell
Favorite Thing #5 - Dying buttons!  (Who knew??)
Rit Dye
..and then you can use them for fun holiday projects like this..

..Or this..

Pinterest
..Or stocking stuffers like these!
Pinterest
(Have I mentioned my mild obsession with buttons?)

Ok.

On to the home ec post sneak peek..

The first project will be from a really nifty book I got as a gift for Christmas last year.  It's not a vintage book, but it's full of vintage ideas inspired by one of my favorite authors of all time, Jane Austen.


Amazon
 The project is a secret, but I will tell you that it's perfectly perfect for the cooler weather ;)

Have a wonderful day!

Hugs and Smooches,
D
Related Posts Plugin for WordPress, Blogger...