Showing posts with label Beading. Show all posts
Thursday, July 19, 2012
Outfit Post - Hearts Ease
I have a dear family friend that owns a florist and gift shop in the next town over from mine. (Her son took me to my 8th grade graduation dance ;-)
She has a passion for antiques, particularly from the 1800's, and she has unearthed some amazing treasures, including this beautiful vintage tortoiseshell comb that she gave me as a gift.
I stop by her shop often to buy little treasures, see what new items she's unearthed and to ask her advice on things like cleaning vintage garments, or figuring out the genesis of an item.
The little felted brooch is something she made as well. In the 1800's, it was referred to as "hearts ease". I just love that name and it's implications. It always makes me smile when I wear it :)
Hugs and Smooches,
D
Labels:
1800s,
Beading,
Charlotte Russe,
Handmade,
Hearts Ease,
J. Crew,
Lavendar,
Lilac,
Macys,
Pansy,
Purple,
Thrifted,
Victorian Era,
Vintage,
Yellow
Tuesday, May 29, 2012
Home Ec Tutorial - The May Flowers Necklace
My wee Mum has a birthday coming up on May 31st. It's pretty appropriate that she was born in the month of "May Flowers" since she has two green thumbs. Here's a (small) example of her gardens.
So, I decided the most appropriate gift for her would be to make a necklace with a "May flowers" theme. Here's what you'll need to get started:
First, you're going to take one of your heavier weight chains and cut two pieces approx 9" long.
Next, take the lightest weight chain and cut it to 16.5"
Cut your third chain (preferable one with a little embellishment, like the one here) to 18.5"
Your last chain (this one has some rhinestones on it for visual interest) should be about 20.5" long.
Your next step will be to attach the 3 longest pieces together on each end with a jump ring. Then add your shorter length of chain to each side. When they're attached, they should look like this on each side.
Attach the the clasp pieces with a jump ring to the loose end of each of the shorter pieces like this.
Now you're going to add a few clusters of flower beads to the center chain (the one you cut to 18.5")
Start with a head pin and slide a bicone bead onto it. (You could also use pearls here if you prefer.)
Next, add a floral bead.
Using your needle nose pliers, bend the wire to a 90 degree angle. Clip off excess with wire cutters, leaving just enough to make a small loop. (Don't cut too much! It's easier to make it shorter if you need to, but you can't add length back on.)
Using your pliers, bend and shape the wire into a small closed loop.
Make several of these using different combinations of beads and then attach them in little clusters with a jump ring at even intervals along the center chain.
Attach your brooch to one side of the necklace where the grouping of chains meet the shorter chain and voila! A May Flowers Necklace :)
If you decide to make your own, I'd love to see your variations! Post them on my facebook page here.
Hugs and Smooches,
D
So, I decided the most appropriate gift for her would be to make a necklace with a "May flowers" theme. Here's what you'll need to get started:
- 4 different weight chains (you can re-purpose old necklaces that you don't wear anymore for this, or purchase new chain.)
- Head pins (for beading)
- Jump rings (various sizes)
- Clasp
- Flower shaped beads (I used Laliberi, which I loove, and you can find them at Joann's)
- Bicone beads
- Needle nose pliers and wire cutters
- Flower brooch
First, you're going to take one of your heavier weight chains and cut two pieces approx 9" long.
Next, take the lightest weight chain and cut it to 16.5"
Cut your third chain (preferable one with a little embellishment, like the one here) to 18.5"
Your last chain (this one has some rhinestones on it for visual interest) should be about 20.5" long.
Your next step will be to attach the 3 longest pieces together on each end with a jump ring. Then add your shorter length of chain to each side. When they're attached, they should look like this on each side.
Attach the the clasp pieces with a jump ring to the loose end of each of the shorter pieces like this.
Now you're going to add a few clusters of flower beads to the center chain (the one you cut to 18.5")
Start with a head pin and slide a bicone bead onto it. (You could also use pearls here if you prefer.)
Next, add a floral bead.
Using your needle nose pliers, bend the wire to a 90 degree angle. Clip off excess with wire cutters, leaving just enough to make a small loop. (Don't cut too much! It's easier to make it shorter if you need to, but you can't add length back on.)
Using your pliers, bend and shape the wire into a small closed loop.
Make several of these using different combinations of beads and then attach them in little clusters with a jump ring at even intervals along the center chain.
Attach your brooch to one side of the necklace where the grouping of chains meet the shorter chain and voila! A May Flowers Necklace :)
If you decide to make your own, I'd love to see your variations! Post them on my facebook page here.
Hugs and Smooches,
D
Saturday, August 20, 2011
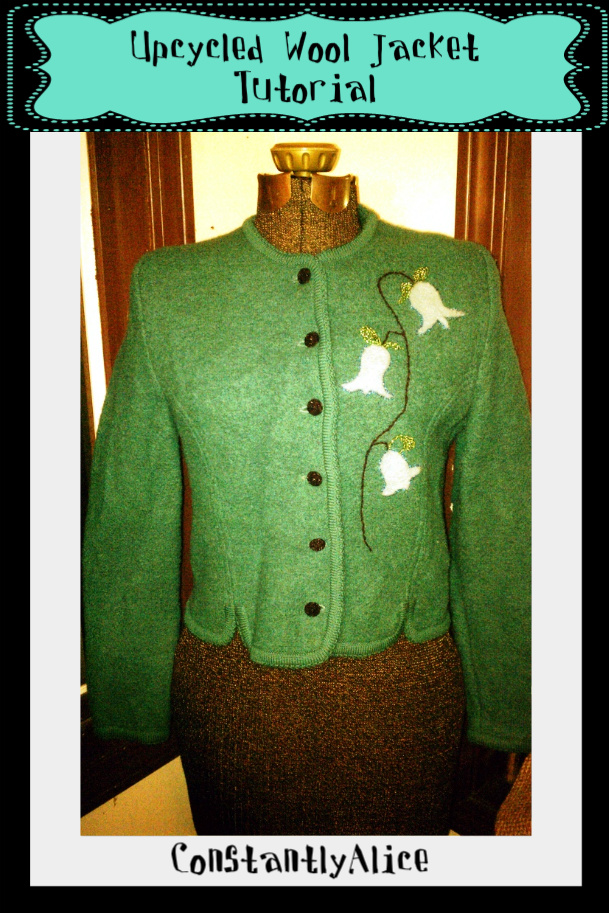
Upcycled Wool Jacket Tutorial
I have a thing for boiled wool jackets. They are easy to find, warmer than a sweater but lighter than a coat and they come in such nice colors! They typically range in decade from the 1960's-1980's and usually have a great shape to them, pretty buttons and sometimes have little details in the shaping or finishing of the garment.
Once in a while, I'll run across one with some small flaws (moth holes, stains etc.) or one that looks too "dated" (typically the ones from the 80's). These ones are perfect for the project I'm going to show you. They can be found in just about any thrift or resale shop and are very reasonable.
So, without further ado, what you will need for this project is the following:
- Felt - You can get this a number of ways. You can wash a wool sweater in hot water. This will cause it to shrink and you will be able to cut and use the material like it is fabric. You can also pick up squares of felt at your local fabric or craft store. Make sure it is wool felt and not acrylic.
- Needle Felter - This can also be found at any craft store. I've shown it to the right, it's basically a bunch of long serrated needles attached to a handle. You will use this to mesh the felt into the fabric of your coat.
- Foam - This is for felting on. You need something on the opposite side of your fabric for the needles to go into.
- Thread
- Seed beads
- Yarn or Embroidery Floss
- Assorted sized needles
- Buttons (optional)
Take the square of felt you purchased and cut out the shape that you wish to felt onto your jacket. I did mine freehand, but you could also sketch them out or use a stencil to trace your design.
Once you have them cut (mine look like little octopus at this point :) pin them to the jacket where you would like them. Take some time to arrange them carefully because once you begin felting, you won't be able to move them!
Now that you have them pinned, select the area you wish to begin with and place your foam pad underneath. Take your needle felting tool and begin punching it into the shape, beginning at one side and continuing over the entire shape until it blends into your wool jacket. Repeat with each shape you have cut out.
After your shapes are felted, you want to give them some definition. I created a stem for my bluebells using black wool yarn and a basic backstitch. You could also use the yarn to define the seams of your jacket if it has shaping, or to go around the outside of your object and give it a border.
Then, for a little texture and sparkle, I decided to outline my flowers with small blue seed beads and add beaded leaves. At this point I would like to add the disclaimer that I don't bead often. I am not sure if there is an official method for beading, but I basically bead the outline of the shape I wish to add and then fill it in. Simply poke your threaded needle up from the back of the fabric, add a bead and then insert the needle back into the fabric as close to the initial stitch as possible. Repeat until you have the desired shape.
That's it! If you don't like the buttons you can change them out (like I did) but usually these types of jackets come with really gorgeous buttons.
I hope this was helpful. If you decide to do your own jacket project, I would LOVE to see your finished results!
Hugs and Smooches,
D
Subscribe to:
Posts (Atom)